


Learning Python for SEO Part #3
Welcome to part three of Learn Python for SEO. This time, we will look at running Python on the desktop. This part of the course builds on your experiences of programming language fundamentals and Python programming in the cloud. Even if you have already read parts one and two of this series, it may be worth a quick scan before starting this section.
This is part three of a multipart series “Learn Python For SEO“:
Contents: “Learn Python For SEO” is an overview of the course.
Part 1: “Thinking in Algorithms and Writing Pseudocode”, Introduces the fundamental programming concepts you will need to get the most out of practical exercises later.
Part 2: “Python – A practical introduction” gives a hands-on guide to Python using an online Python Interpreter – no complex software installation required.
Part 3: “Python – Install Python and Download Your First Website” (this article) moves to using a local IDE leveraging Python to download webpages en masse.
Further parts pending…
Why Python on the Desktop?
Python runs in many places. The choice of where you write it can limit where you choose to run it. If you develop programs on your local computer, it doesn’t restrict you to running Python on your computer. You can write Python on your PC and upload it to the cloud on your own server or VPS (Virtual Private Server). Your PC is just a starting point in creating your own SEO toolbox to help automate your SEO.
In part two of this “Learning Python for SEO” series, we looked into online Python interpreters such as repl.it and onlinegdb.com. We also looked into implementing functions and loops, as well as using third party packages.
In this part of the series you will build on these skills and develop Python programs on your own PC using an IDE (Integrated Development Environment). An IDE is a tool that helps programmers write code and often lets them run their programs from within the editor. There are many IDE’s for Python – the one we introduce today is called PyCharm. PyCharm is written by JetBrains – a company well known in developer circles with a reputation for building good developer tools.
The good news – JetBrains make a free version of PyCharm.
We will also set up your first project and repeat the exercises from part 2 using PyCharm. Using an IDE, like PyCharm, will help you program more efficiently by providing useful information and suggestions.
Installing Python
Python is a popular programming language with a huge volume of users worldwide – however, installing software on PC’s is not for the unwary. It is important to speak to whoever owns or is responsible for your IT equipment before installing software upon it. If it’s your own equipment – only proceed after you have diligently performed the usual system backups and contingency planning all good guides suggest before installing software. These instructions are general and it is important to satisfy yourself they are applicable to your situation before proceeding.
We have based this guide on our experience of installing python and Pycharm on windows – however, the software should run on Macs and Linux with only slight adjustments to the installation process. The first stage of installing Python is to test to see if it is already installed on your system! This can be done by opening a terminal such as Windows PowerShell and typing python --version (python minus minus version) and pressing enter. If Python is installed it will print the current version. If not, there will likely be some sort of error.


If you already have Python set up, you can move on to downloading and installing PyCharm.
If you don’t have Python, don’t worry – it’s available for free for many platforms from the python.org website.
To install Python, visit https://www.python.org/downloads/ – there are many choices on screen. You should see an invitation to download the latest version for your operating system, as shown below.
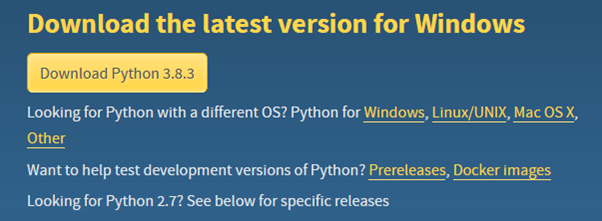
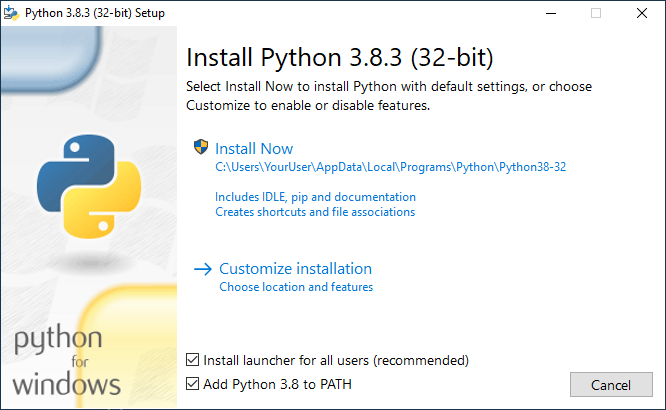
As with many programs, you will need to download an installer – in this case – the “Download Python 3.8.3” link (your number may be slightly higher). After the download has completed, you will need to complete the installation by running the installer. Depending on your machine or version of Windows, you may see either a 32 bit or 64 bit version of Python. The installer is pretty normal – For Windows, you may wish to check the “Add Python 3.8 to PATH” option and click “Install Now”.
To check that you have successfully installed Python, repeat the instructions above – open your terminal, such as Windows PowerShell. Type python --version (python minus minus version) and press enter.
If Python has installed, it should print out the version installed – in our case 3.8.3. Congratulations – let’s now look at installing an editor.
Download and Install PyCharm
Earlier, we introduced PyCharm from JetBrains as our Python IDE of choice.
PyCharm is available from the JetBrains website at https://www.jetbrains.com/pycharm/ (shown below). The “download” link takes you to the PyCharm downloads page.

You will be presented with a choice for either Professional (paid) or Community (free) editions of the tool (pictured below).
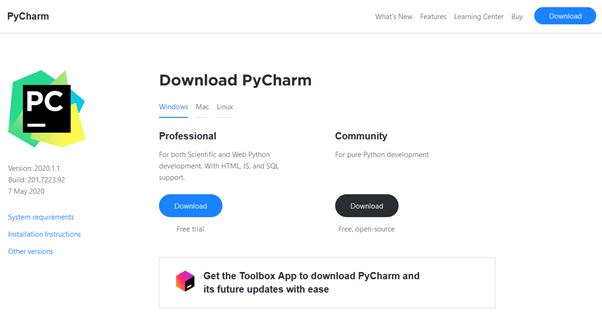
The Professional version is a quality product and well worth considering if you do a lot of Python development. However, for learning you may be better suited to the Community edition, so we will assume you have selected this option.
Once the file has been downloaded, you will need to “run” it to complete installation.
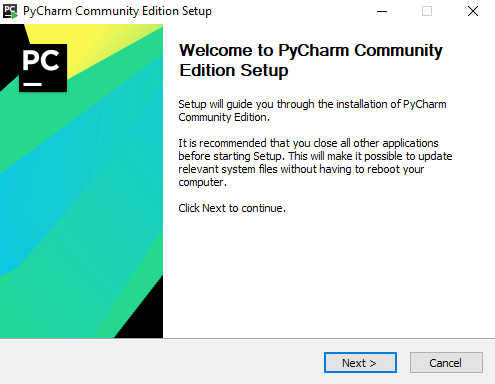
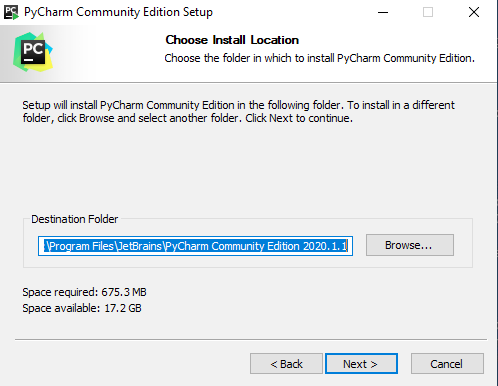
As with many software installations there is a choice to use a different program location. Assuming you are happy with the preset, click next.
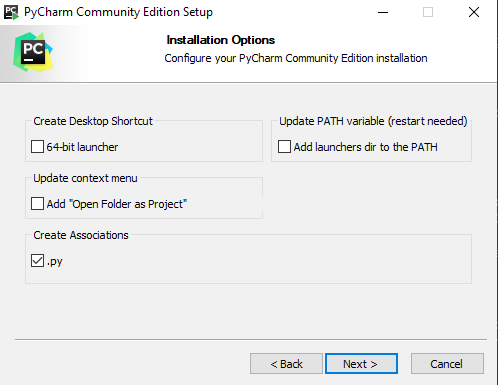
For the installation options on the next screen, we suggest you consider creating the file associations. This means that if you open a Python file (one ending in “.py”) in Windows, then the file will be opened in PyCharm.
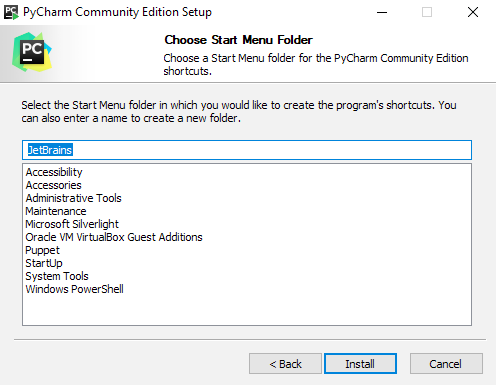
The final screen lets you change where PyCharm is listed on your start menu. We just leave it where it is. Assuming you are happy – “Install” will begin the installation.
Once the software is installed, you will be presented with a confirmation dialog and a few options. Assuming you want to get started, check the “Run PyCharm Community Edition” box and click “Finish” to start using PyCharm. After it has launched there will be another guided setup, this time for the customising the software to suit your preferences.
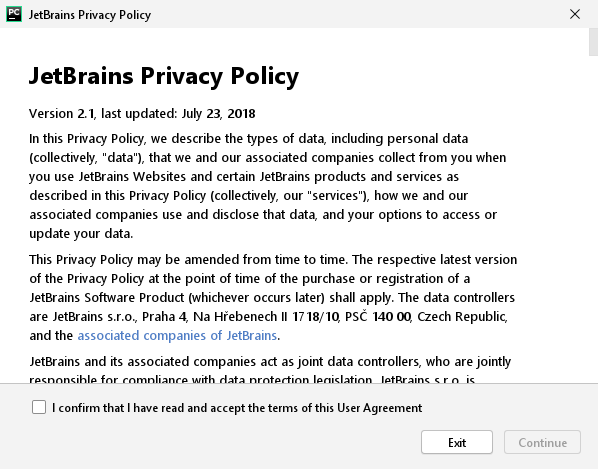
JetBrains may first ask you to agree to the privacy policy. If you wish to use PyCharm this is a necessary step but, of course, read through and ensure you are happy with the conditions.
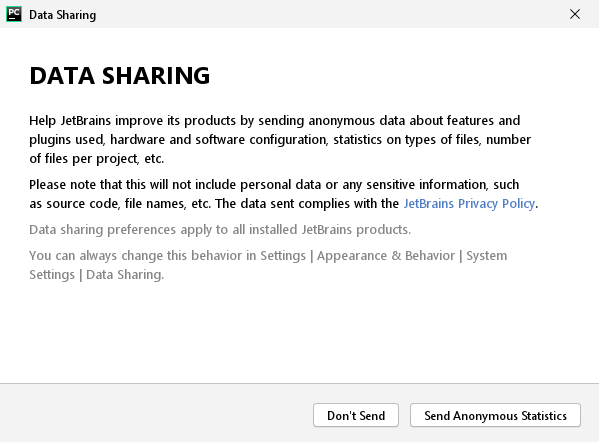
After that, they ask whether you’re happy to share anonymous statistics to help improve the product. There are options to send or not to send statistics.
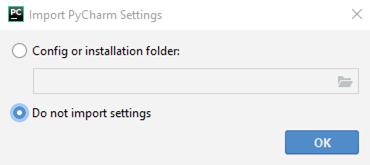
You may next be asked if you’d like to import any existing PyCharm settings. This is dependent on if you’ve had anything made by JetBrains previously so it’s likely you won’t see this. If you do, and assuming you’ve not used PyCharm before, you should select “Do not import settings”.
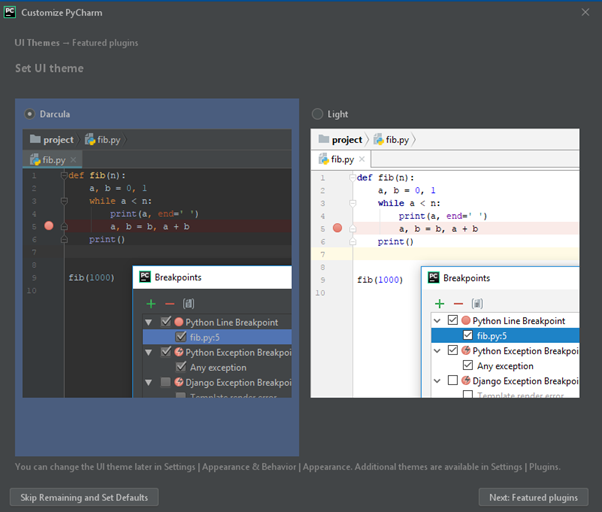
Next up is the UI theme. Our preferences are split – some developers liking “Darcula” – others “Light”. There is an option to change later, so choose whichever feels right for you.
After choosing your theme, PyCharm will suggest some plugins that may be of interest. We just click “Start using PyCharm” and proceed.
The pre-launch configuration is now done! Once PyCharm has launched, we’re ready to set up a project and start programming.

Hello World in PyCharm
By now, we hope it’s clear why we chose to use an online Python Interpreter for part two of this series – there is a lot more work in getting up and running with Python on the desktop and PyCharm than the cloud based alternative.
The setup is worth the effort – unfortunately, however, you have not finished setting things up just yet. There is a little more work to do before we can get started. In PyCharm, code exists in “projects” – so in order to run a “Hello World” program, we first need to create a project to hold it…
Setting up your first project
Now we have installed PyCharm, let’s look at creating a project to hold our “Hello World” program.
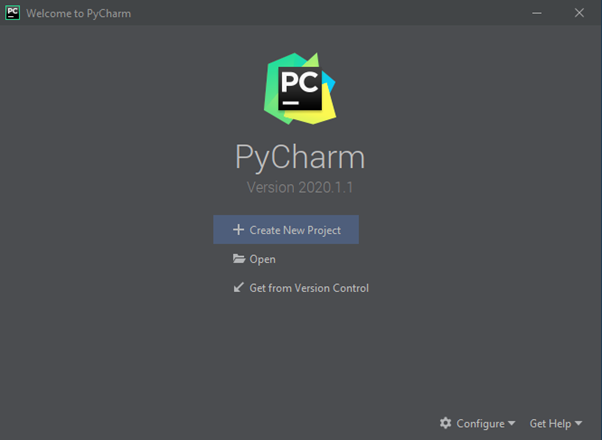
Open PyCharm and click “Create New Project”.
The next screen can be somewhat complex – verging on overwhelming – for new programmers but, becomes easier to understand with time.
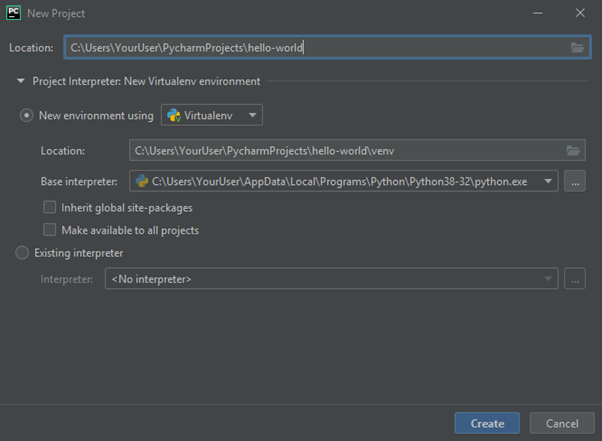
This screen asks for a directory for your project. The default “PyCharmProjects” in the user’s directory is a reasonable location which we’ll be using but, you’re welcome to choose a different one that works for you. In here, we call our project “hello-world”.
Next up is a decision of an environment. By default, PyCharm will select “New environment using” with the option “Virtualenv”. It will also automatically set the location based on your project location and base interpreter based on your Python installation.
A quick explanation you may wish to skip over – Virtualenv is a tool used to reduce the chances of your Python projects interfering with each other. We introduced packages in the last step. When using them on your own PC, they’re installed to your Python globally. If you have multiple Python projects different versions of packages could conflict or you may accidentally remove a package not realising an existing project requires it. If you would like to know more, the Python Packaging Authority has Virtualenv documentation on their website.
Once you have entered the project name and chosen your environment, click “Create”.
PyCharm will change to show you the programming environment. First though, is a popup (see below). Many JetBrains products feature a “Tip of the Day”. As the name suggests, this gives a different tip each day, which can helpful for new users. It’s suggested that you keep them for now. However, if you find them annoying, you can remove the feature by ticking the “Don’t show tips” checkbox.
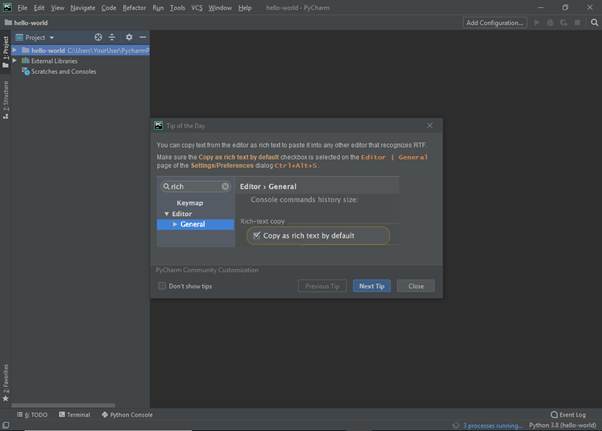
After you have read the daily tip, paused to contemplate it, and ended the short learning experience, click “Close”. You now need to access the project menu – located on the left side of the screen (see below).
Right-Click the project folder and create a new “Python File”.
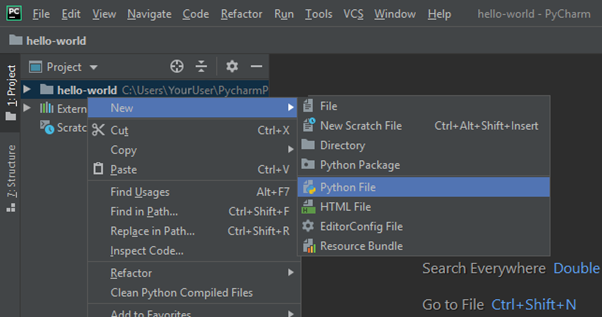
We will call our file “hello-world”. These options, as the name suggests, creates a new Python file called “hello-word” in your project!
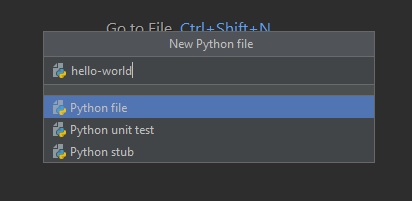
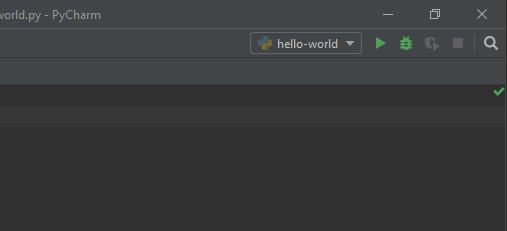
The Python file you have just created will be automatically opened, as can be seen by the active tab containing file name “hello-world.py”. Because we created a Python file, PyCharm automatically added the “.py” file extension to denote its file type, and shows it here.
Let’s have a quick run-down of PyCharm.

Because we’ve not yet run our program, the run panel and output won’t yet be visible. This will come in handy shortly though. On the left (in orange / brown on the image above), is the project structure and files, showing everything in the project. This is where we created our “hello-world” file in the previous step.
To the right of that (in green) is the editor panel. This shows the open files (in the same way your browser shows tabs at the top) and allows you to edit the active file (whichever tab is selected). In this screenshot, we already have the code in place, which is the next step.
You may also notice that at the top (in blue), the path of the active file (the one open in the editor) is shown.
We are now ready to enter our “Hello World” program.
In the python file you have just created, add a print statement to print out “Hello World”:
print('Hello World')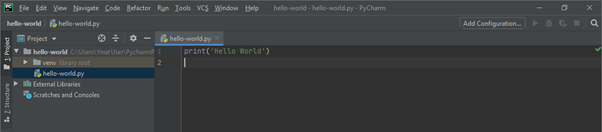
The first time we run our program, PyCharm won’t know what to run. This is because in a larger project there would be many Python files that call each other. PyCharm doesn’t know which one to pick so it relies on the programmer telling it.
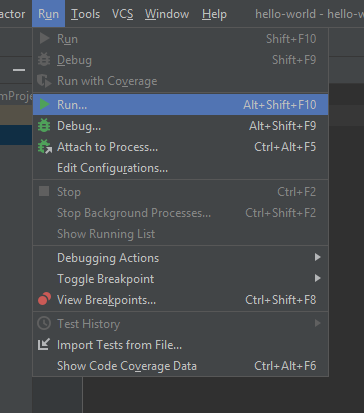
To do this, click “Run” in the top menu, then select “Run…” from the dropdown menu (Alt+Shift+F10)
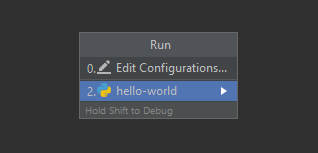
At this point, PyCharm will ask you to setup what should be run (pictured below). The first option, “Edit Configurations”, can be used to setup more customised run configurations changing environment variables, interpreter, and more but – for our purposes – we don’t need any of these. Instead, we can select “hello-world” (our Python file) and PyCharm will automatically set up the run configuration for us and run it immediately.
In a similar manner to the cloud Python interpreters, the output from your program will be shown at the bottom of the screen.
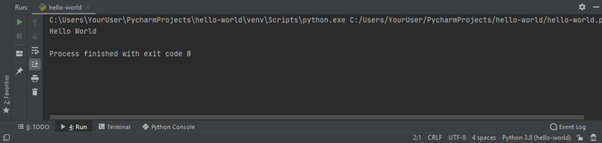
If all is well, it should say “Hello World”. You have now set up and created your first project on PyCharm!
Now you’ve added a run configuration (by following the previous steps), it’s much easier to run your program in future. PyCharm will now have a green play button in the top right, similar to the online interpreters used previously. Clicking this (or pressing Shift+F10) will run the program without you needing to navigate through the menus.
Well done! If you want to practice a little more – feel free to return to earlier material in this course and look at the other example programs from section two. When you are comfortable you have a feel for editing programs, running them, and viewing the output – you will be ready to move onto the next stage of this section of the course, below.
Retrieving a Webpage
In this section, we will look at using PyCharm to download a webpage – a relatively simple function once you know what you’re doing but, a very useful building block for any future work. This could include technical SEO tasks like spotting missed opportunities on our own website.
An important aspect to note – this is example code – and as such some essential steps – such as checking and acting upon robots.txt are omitted. In the majority of cases programs which access websites should process and abide by the rules in robots.txt.
In part two of this tutorial we parsed a mock webpage with BeautifulSoup4. Today, we’ll be utilising a library called “Requests” to retrieve pages from the web. Requests is a library for performing HTTP requests (downloading webpages), handling all the technical aspects your browser normally handles for you, too.
If you cast your mind back to part two, you may remember there was a little complexity around installing third party modules in repl.it. Fortunately, PyCharm makes this process more straight forward.
Instead of starting by configuring or installing third party modules like we had to with repl.it, we can go for a code first approach in PyCharm and let the IDE do the heavy lifting:
import requests

response = requests.get('https://example.com')

print(response.text)
Let’s break down what this code does. We first import the “requests” module and then call the get method on it, which downloads the content at the provided URL. The line print(response.text) gets the response as a string and prints it to the console as we did with the previous “Hello World” example.
Because we are yet to download and configure the Requests library, PyCharm indicates a problem with the code – by underlining the “requests” call and placing a red mark on the right hand side of the window, as can be seen in the screenshot below.

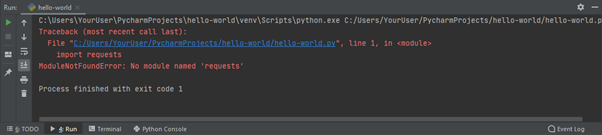
PyCharm goes further than just indicating the error in the editing pane. If you try to run the code, PyCharm will also give the ModuleNotFoundError: No module named 'requests' error.
PyCharm tries its best to help us without getting in the way. Hovering the mouse over either of the red error indicators displays a message “No module named requests”. As well as highlighting the error, PyCharm suggests how the error can be resolved. For this error, the suggested solution is “Install package requests”. To use the suggested solution, you can either click the “Install package requests” link, or press the Alt+Shift+Enter keys together on your keyboard.

There is a chance that PyCharm does not offer the solution shown here – if this is the case, restarting PyCharm or modifying and saving the file again should fix the issue (this should be a one off because it’s first use).
If you choose the suggested fix – “install package requests” then PyCharm will attempt to perform it. PyCharm bursts into activity, displaying some messages in the bar at the bottom of the window. After a few moments, a success message should appear in the bottom left, indicating the module has been installed successfully:

When this impediment is overcome, you will be able to run our new program. To run the program, you can use the same run menu item as described in the hello world example. To recap – run your program using the play button in the top right, or by pressing Shift+F10.
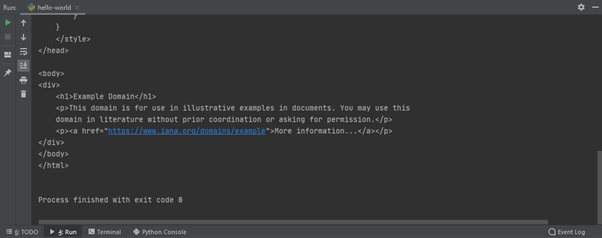
All being well – if your code is working and PyCharm has successfully managed to download the Requests module for you – then running your program will result in some content in the output window. Success sees content similar to the one shown in the image above – the HTML for example.com (a little scrolling is required).
Using BeautifulSoup4 to Parse a Webpage
Downloading a page is one thing – doing something useful with it is another. Fortunately, the BeautifulSoup module – “BeautifulSoup4” in its latest incarnation – provides a pretty full toolkit for pulling various details out of a webpage.
Before we begin – it’s worth noting that with great power comes great responsibility. We will look at accessing websites, downloading pages, and analysing results to help improve our SEO. However, these examples are far from production ready. Tools like ScreamingFrog and DeepCrawl are the result of years of development and understanding – and it is unlikely an enthusiastic new Python programmer can get close to the power of these tools without a great deal of unforeseeable pain and hassle.
We can begin this part with the code we created above in “Download a Webpage with PyCharm”.
Having demonstrated that the requests module can download a webpage, in order to analyse content more effectively, we’ll need the BeautifulSoup4 library introduced above.
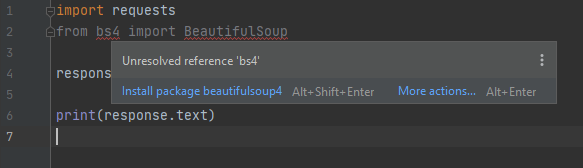
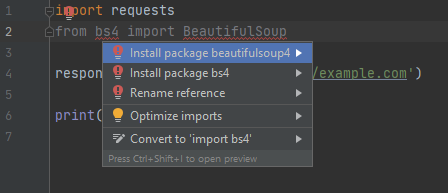
To use BeautifulSoup in our code, we need to add from bs4 import BeautifulSoup under the requests import. Once again, PyCharm will underline (in red) the new import statement. This can be resolved the same way as before – bring up the dialog by hovering over the error or by placing the cursor on the bs4 part of the import and pressing Alt+Enter, and then select “Install package BeautifulSoup4”.
Different to last time, we have errors under both bs4 and BeautifulSoup. If you try to install the package via the BeautifulSoup prompt, it will fail because it tries to install an older version of the package which is no longer supported in Python 3 – make sure to install BeautifulSoup4 via the bs4 prompt.
PyCharm will once again automatically install the package ready for use.
The following code is very similar to the BeautifulSoup example we looked at in part two of this series. Like in our previous tutorial, the title, links, and headings will be extracted from the page.
import requests
from bs4 import BeautifulSoup

response = requests.get('https://example.com')

soup = BeautifulSoup(response.text, 'html.parser')

print('title: {}'.format(soup.title.string))

print('links:')
for link in soup.find_all('a'):
    print('  - target: {}'.format(link.get('href')))
    print('    anchor: {}'.format(link.string))

print('headings:')
for heading in soup.find_all('h1'):
    print('  - {}'.format(heading.string))
This should output:
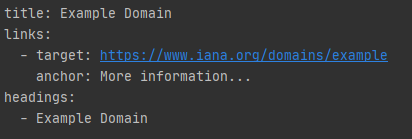
Congratulations! We have downloaded a page and extracted some important parts of the page!
We could now look to do some SEO tests on this individual page – however – this does not make the best use of a computer. Computers tend be be great at automating a volume of simple tasks. So let’s look at something more ambitious – downloading a significant part of a website!
Reading a CSV
If we want to download a website, there are a few different routes we can use.
One way is to start with the homepage, and write out own crawler to spider out and aim to find the entire website. This would involve following links, deciding how deep to crawl, extracting more links from the downloaded pages, checking the links are internal, and avoiding long or even infinite redirect loops.
A different way – which can save time – is to start with someone else’s crawl data – for example – a CSV exported from majestic.com and crawl the pages in that. For the purpose of this example, we have included a small subset of a top pages report for blog.majestic.com.
You can download this extract of 49 rows that includes a variety of URLs of different content types and status codes. You can download this CSV here.
Fortunately, the ability to read CSVs is built into Python – we still need to import the functionality into our program but, you do not need to ask PyCharm to install the module like we did for Requests and BeautifulSoup4. For this next example, remove all the lines used for the BeautifulSoup example, and type in the following code:
import csv

file_location = 'W:/path/to/input-pages-blog-majestic-com.csv'

with open(file_location, mode='r', encoding='utf-8-sig') as csv_file:
    csv_reader = csv.DictReader(csv_file)

    for row in csv_reader:
        print(row['URL'])
It needs a little work before you run it, and we will begin with an explanation.
This short bit of code shows the essentials of processing a CSV file. The file needs to be opened so the program can read from it. A CSV reader is then created to help us understand the contents of the file. The reader is called multiple times to step through the file, one step at a time. In the example above, the reader is called in a loop which results in the URL column for each row in the CSV being printed.
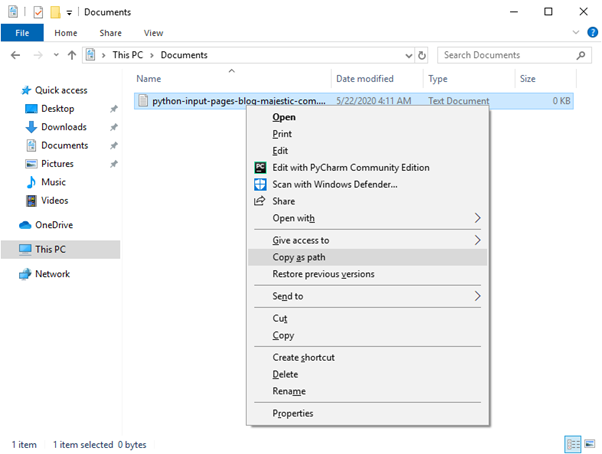
The file_location should be set to wherever you have saved the export. One way to get the full path is to use Windows Explorer – navigate to the saved file, hold Shift on your keyboard, and right click. In the context menu there will be an option to “Copy as path”.
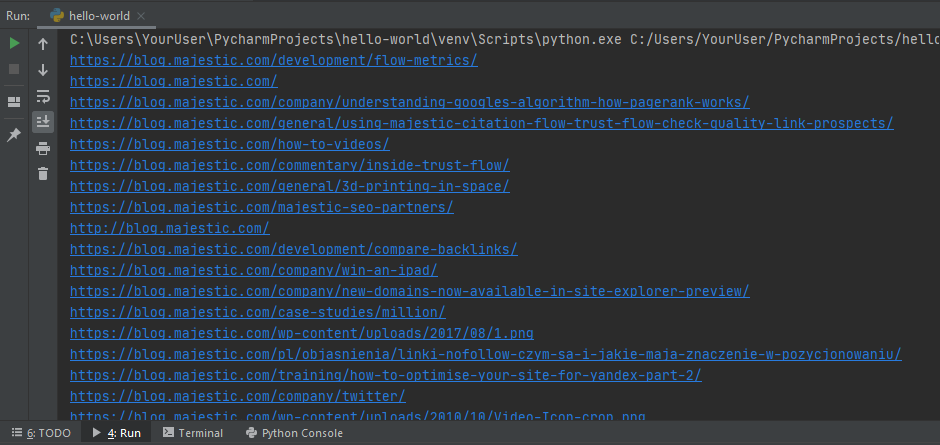
Replace the file location with your own and run the program. If your output looks looks like a list of URLs (as shown below), congratulations!
In the next steps we’ll be bringing it all together to download all the pages, parse them, cache them, and make our own mini-index.
Filtering Down to Prospects
A common grumble in backlink checker extracts is that they contain data that isn’t suitable for a given purpose. Unfortunately, the downloads are used in a variety of use-cases and it’s impossible to satisfy everyone all of the time. In this case, even though the CSV example file is from the Site Explorer Top Pages report, some rows will not resolve to a downloadable HTML page.
A simple approach to filter the content is to look at the URLs in the CSV file, and to remove those which have a certain file ending – like “png” or “jpeg”. In implementation it’s considered better practice to avoid editing files and instead, create a new file containing the filtered end result. Filtering rows then becomes relatively straightforward – we can use the string method endswith to decide whether a given row in our input file needs to be written to our output file.
import csv
from urllib.parse import urlparse, urljoin

file_location = 'W:/path/to/input-pages-blog-majestic-com.csv'

# Open the CSV file in read mode
with open(file_location, mode='r', encoding='utf-8-sig') as csv_file:
    csv_reader = csv.DictReader(csv_file)

    # A set of resources to fetch later
    prospects = set()

    for row in csv_reader:
        url = urlparse(row['URL'])

        if not url.path.endswith(('/feed/', '.png', '.jpg', '.gif')):
            prospects.add(urljoin(row["URL"], url.path))

  print('There are {} prospective pages'.format(len(prospects)))
This code builds upon the csv reading we just covered, filtering all of the pages to remove any types we’re not interested in and storing them in a set.
The prospects variable is a set that will be used to store all the URLs we are likely to want to fetch. A set is a collection of unique (no duplicates) unordered elements. We’re using it here because order doesn’t matter and after removing parameters and hashes, some URLs may be duplicates and only need to be downloaded once.
To filter the URLs, we check the path endings. however, with a URL such as “https://example.com/path/page.html?param=inconvenient#part-of-page” there’s a parameter and a fragment in the way. Rather than start dissecting this string ourselves, it’s often better to use an established solution with more development and testing time than we have (this is the same for the Requests and BeautifulSoup packages). Here we can use Python’s built-in urllib to parse the URL for us by doing url = urlparse(row['URL']). Now when we reference url, it will be a named tuple of all the different parts that make up the URL: scheme (protocol), network location (domain/subdomain), path params, query params, fragment – urlparse is well documented.
Now our URL is broken up appropriately, we can check whether the path (no need to worry about parameters or a fragment) ends with any of our filter endings – if not, add them to the set.
if not url.path.endswith(('/feed/', '.png', '.jpg', '.gif')):
    prospects.add(urljoin(row["URL"], url.path))
To avoid storing the parameters and the fragment with the URL, we use urljoin(row[“URL”], url.path). This takes the path part of the URL and combines it with the original URL, resulting in a full URL with no parameters or fragment.
After running the new script, you should get something like this:
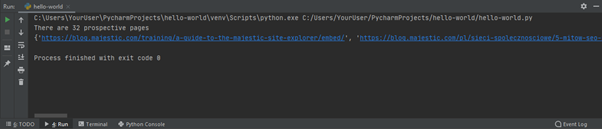
The first line shows how many unique URLs passed our filter. The second lists them all (spanning a large width).
Checking Prospects are Webpages and Caching Them
While we’ve reduced the number of prospective URLs to fetch, they’re still that – prospects – some may be 404s, other may not return HTML. One way to solve this is to break downloading a page into two steps – a HEAD request (which tells the webserver to omit any content), followed by a GET request to download the page, where appropriate. The HEAD request returns a set of HTTP headers which contains information about the resource, such as the content type – for HTML, it’s “text/html” – and whether it’s a redirect. Our code will save some of this valuable header information as well as all of the downloaded pages locally so they’re easily available for future use.
The code is getting a little large now as we add more features so bear with us as we explain what’s going on.
import csv
import time
from urllib.parse import urlparse, urljoin
import requests

file_location = ' W:/path/to/input-pages-blog-majestic-com.csv'
output_dir = 'W:/code/python-tutorial-blog'
index_csv_location = '{}/index-file.csv'.format(output_dir)

# Open the CSV file in read mode
with open(file_location, mode='r', encoding='utf-8-sig') as csv_file:
    csv_reader = csv.DictReader(csv_file)

    # A set of resources to fetch later
    prospects = set()
    for row in csv_reader:
        url = urlparse(row['URL'])

        if not url.path.endswith(('/feed/', '.png', '.jpg', '.gif')):
            prospects.add(urljoin(row["URL"], url.path))

    print('There are {} prospective pages'.format(len(prospects)))

# Open index file to write output
with open(index_csv_location, mode='w', newline='', encoding='utf-8-sig') as index_csv:
    fieldnames = ['id', 'url', 'filename', 'status', 'location']
    writer = csv.DictWriter(index_csv, fieldnames=fieldnames)
    writer.writeheader()

    page_id = 0

    for url in prospects:
        print('Processing {}'.format(url))

        # Fetch header first to get check content type
        response = requests.head(url)
        # Content type can contain encoding information after a semi-colon (`;`), which we're not interested in
        content_type = response.headers.get('Content-Type').split(';')[0]

        if content_type == 'text/html':
            page_id += 1
            cache_filename = ''
            location = ''
            if response.is_redirect:
                location = response.headers.get('Location')
            elif response.status_code == 200:
                response = requests.get(url)

                cache_filename = '{}/page-{}.html'.format(output_dir, page_id)
                with open(cache_filename, mode='w', encoding='utf-8') as cache:
                    cache.write(response.text)

            writer.writerow({
                'id': page_id,
                'url': url,
                'filename': cache_filename,
                'status': response.status_code,
                'location': location
            })
        else:
            print('Ignoring non-HTML content type "{}"'.format(content_type))

        # Pause the execution of the script to prevent an aggressive spam of requests
        time.sleep(1)
The majority of this code should look very similar to the previous examples – let’s review the improvements added.
Here we see the addition of a new import – “time”. This can be used to pause the execution of our script for a number of milliseconds. It’s used here to limit the rate at which we download pages.
There are also two new variables for the output. The first – output_dir – specifies the path our program will write files to. These include the index (our second variable index_csv_location) and the downloaded HTML for each page.
# Open index file to write output
with open(index_csv_location, mode='w', newline='', encoding='utf-8-sig') as index_csv:
    fieldnames = ['id', 'url', 'filename', 'status', 'location']
    writer = csv.DictWriter(index_csv, fieldnames=fieldnames)
    writer.writeheader()
This time, we open another file (our output index) in a similar way to before but, we specify mode='w' which allows us to write to the file instead of reading it. We then create a CSV writer and write the headers to the top of the file.
To make sure the URL is for a webpage, we first make a call to retrieve the header. The header contains a “Content-Type”, which can contain the content type and it’s encoding – for example “text/html; charset=UTF-8”. To just check the type, we split the string on a semi-colon response.headers.get('Content-Type').split(';')[0] and take the first part.
# Fetch header first to get check content type
response = requests.head(url)
# Content type can contain encoding information after a semi-colon (`;`), which we're not interested in
content_type = response.headers.get('Content-Type').split(';')[0]
if content_type == 'text/html':
The next major difference is the caching of the downloaded webpages. As with our index file, we open a file in write mode – this time using the page ID to form the name. The downloaded webpage is then written to it.
cache_filename = '{}/page-{}.html'.format(output_dir, page_id)
with open(cache_filename, mode='w', encoding='utf-8') as cache:
    cache.write(response.text)
Finally, the result is written to the index file. This is in a loop so as the different URLs are processed they will be added to the file.
writer.writerow({
'id': page_id,
'url': url,
'filename': cache_filename,
'status': response.status_code,
'location': location
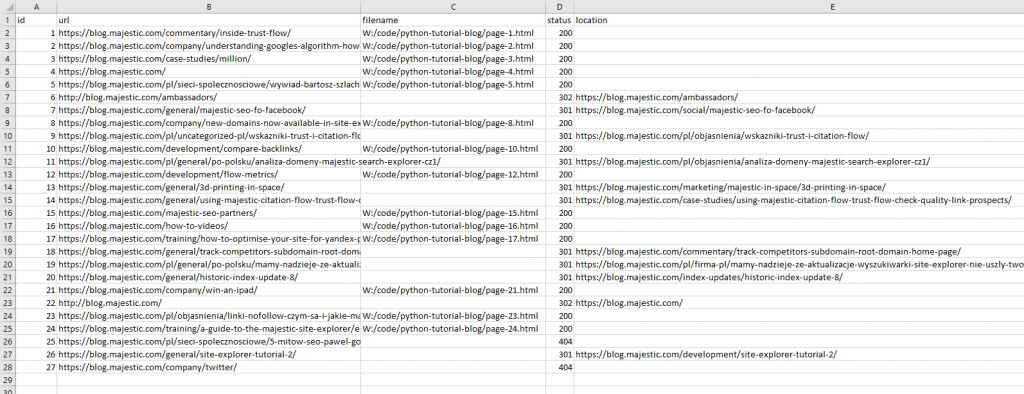
})Let’s take it for a spin! After running the script, you should have an index file and some saved pages, too.
Opening the index file reveals a variety of results – pages with status codes “200” have been indexed and cached, “404”s have been saved but not cached, and redirects have been indexed and show the redirect location. There are only 27 rows here though, even though we had 32 prospective URLs.
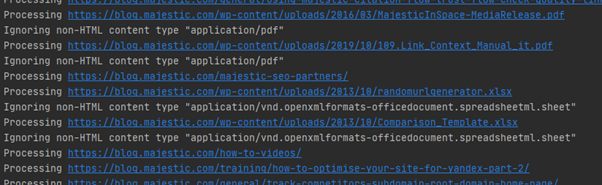
A quick look at the Python logs shows that despite our initial prospect filtering, we missed PDFs and spreadsheets, which were luckily caught by the content-type check. Yay!
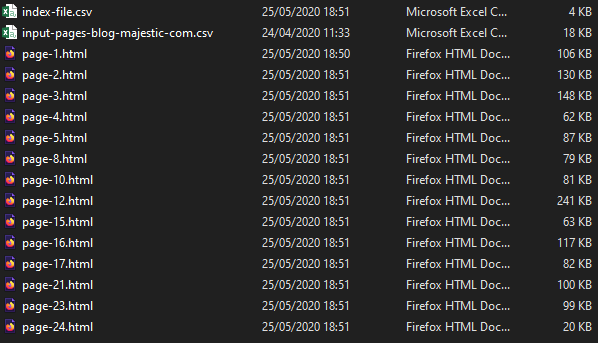
As well as this, you should have a folder full of html files – one for each of the pages downloaded.
Your output will very likely be in a different order to what’s shown here because we used a set to store the URLs which doesn’t remember order.
Wrapping Up (For Now)
Well done for getting through the entirety of this part of our Python for SEO series. We’ve covered:
- Installing Python and PyCharm
- Setting up and running a new project in PyCharm
- The “Set” data structure
- URL parsing and manipulation
- Reading and writing files (as CSVs or text)
- Fetching and checking URL headers
as well as many more granular Python bits and pieces!
Now we can download pages from a websites en masse and parse them so The code we have worked on today can form the core of an automation strategy for technical SEO. Join us next time as we look at building on these foundations to automate analysis and look at ways to collaborate on code development. In the meantime, leave a comment below – we’d love to hear what you make with your new skill. See you next time.
- Site Explorer PDF Reports - April 27, 2023
- Python – Install Python and Download Your First Website - May 26, 2020
- New Feature: PDF Reports - March 28, 2018